How to remove the background from an image on Mac
Your Mac can already remove the background from a picture: Preview, Finder and Photos all have a version of it built in. This guide shows every one of them step by step, where each falls short, and the one-click way to get clean cutouts of hair, fur, logos and whole folders of photos.
By the EraseMyBG team · Updated October 11, 2026 · 9 min read
Quick answer
To remove the background from an image on a Mac, open it in Preview and choose Tools › Remove Background (⇧ ⌘ K), or right-click it in Finder and choose Quick Actions › Remove Background. Save it as a PNG to keep the transparency. For hair, logos, batches or a new background, use a dedicated Mac app such as EraseMyBG, which does it offline in one step.
- Free and built in: Preview, Finder Quick Actions, Photos (Copy Subject), Keynote and Pages.
- Graphics on white: Preview’s Instant Alpha or a remove-white tool, not subject detection.
- Hair, fur, logos and batches: EraseMyBG, $9.99 once, no subscription.


Drag to compare: the original photo and the transparent PNG EraseMyBG made from it on a Mac, offline.
The fastest way: remove backgrounds with EraseMyBG
EraseMyBG is a background remover built only for the Mac. It does what Preview does, then the parts Preview can’t: hair-level edges, logos and signatures on white, new backgrounds, marketplace sizes and whole folders at once. Everything runs on your Mac, so photos never leave it, and it works offline.
- Open the image. Drag it onto the window, paste it with ⌘ V, or right-click it in Finder and choose Erase Background. JPEG, PNG, HEIC, TIFF and WebP all work.
- Let it find the subject. Find Subject with High detail is the default. A few seconds later the background is gone, including the space between strands of hair.
- Pick a background. Leave it on None for transparency, or choose White, Color, Gradient, Studio, Blur or your own image. Add a contact or drop shadow if you want one.
- Export. Click Export for a PNG at the original resolution, or press ⌘ C and paste the cutout straight into Keynote, Pages, Figma or Slack.
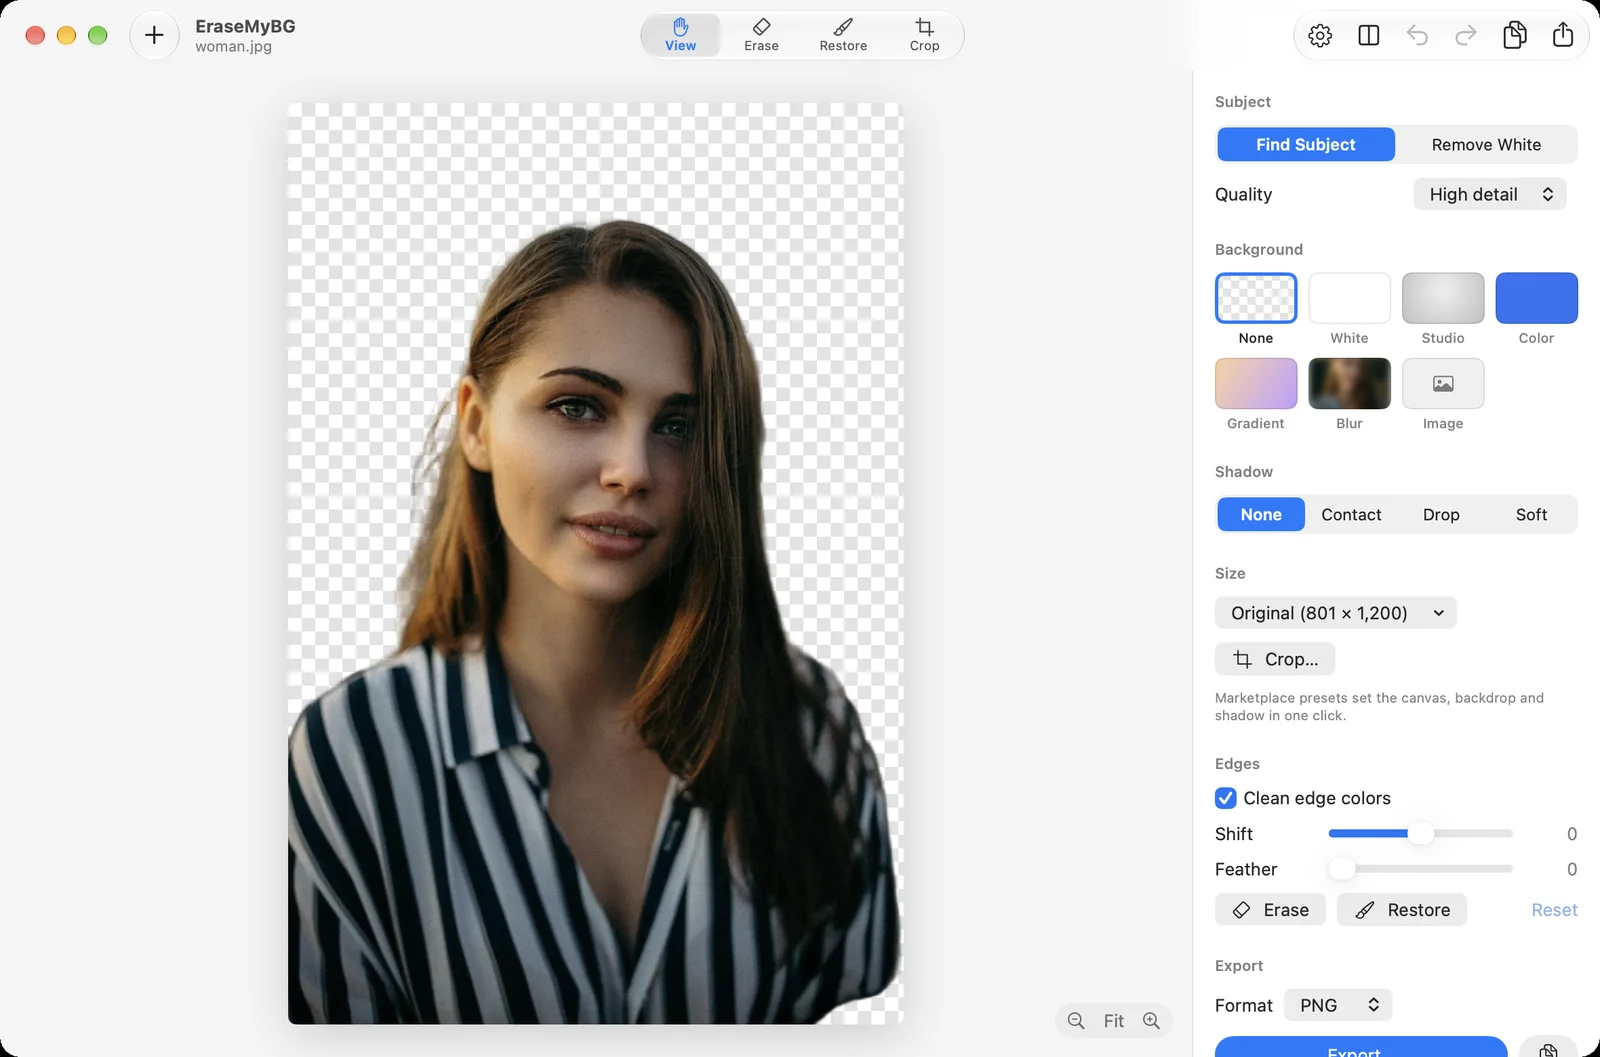
Need to touch something up? The Erase and Restore brushes fix any spot by hand, Clean edge colors removes the old background’s tint from the edges, and the Shift and Feather sliders tighten or soften the outline. For a picture with several people or objects, click the ones you want to keep.
macOS built-in tools vs EraseMyBG
The built-in tools are free and good for a quick cutout of one clear photo. Here’s where they stop, and when an app is worth it.
| Preview / Finder / Photos | EraseMyBG | |
|---|---|---|
| Clear photo of one person or product | Good | Good |
| Hair, fur, fine edges | Often clipped or with leftover background | Dedicated AI matting model, strand-level edges |
| Logos, signatures, scans on white | Usually greyed out; Instant Alpha by hand | Remove White mode, no white fringe |
| Fix mistakes | Undo only | Erase and Restore brushes, edge shift and feather |
| Choose which subject to keep | No | Click to pick people or objects |
| New background (white, color, blur) | No | Built in, with shadows |
| Amazon, Shopify, Etsy, LinkedIn sizes | No | One-click presets |
| Folders of images | Quick Action, no settings | Batch export and watch folders |
| Export formats | PNG | PNG, HEIC, TIFF, JPEG at full resolution |
| Shortcuts and command line | Limited | Shortcuts actions, Finder service, CLI |
| Uploads your image | No | No, fully offline |
| Price | Free | $9.99 once, 3 Macs |
How to remove a background in Preview
Preview’s Remove Background detects the main subject of a photo and deletes everything around it. It’s the quickest free option on a Mac.
- Open the image in Preview (double-click it, or Control-click › Open With › Preview).
- Choose Tools › Remove Background, or press ⇧ ⌘ K.
- If the file is a JPG, Preview asks to convert it to PNG. Click Convert, or click Cancel and use File › Duplicate first to keep the original.
- Check the result, then File › Save. Use Edit › Undo if it cut the wrong thing.
Where it falls short: there’s no way to choose what counts as the subject, adjust the edge or paint back a missing part. If it removes a hand or keeps a patch of wall, your only option is undo. And it can’t put a new background behind the cutout.
How to use Instant Alpha in Preview
Instant Alpha is Preview’s older, manual tool. Instead of looking for a subject, it selects pixels of a similar color, which makes it the built-in choice for logos, icons and graphics on a plain background, the images where Remove Background is greyed out.
- Open the image in Preview and click the Show Markup Toolbar button (the pen-tip icon).
- Open the selection tools and choose Instant Alpha (the magic wand).
- Click on the background and drag. The further you drag, the more similar shades are selected, shown in red.
- Press Delete. Repeat for enclosed areas, such as the inside of an O or an A.
- Save, and accept the conversion to PNG.
Where it falls short: Instant Alpha is an on-or-off selection, so edges come out jagged and keep a thin outline of the old background color, which shows up on dark slides and websites. EraseMyBG’s Remove White mode removes the white from the edge pixels too. Our guide to removing a white background shows the difference up close.
Preview also has a Smart Lasso in the same selection menu: trace around the subject, and Preview snaps the outline to its edges. Choose Edit › Copy to paste the cutout elsewhere. It’s handy for pulling one object out of a busy picture, but tracing by hand takes time and edges stay rough.
How to remove a background from Finder (Quick Action)
- In Finder, select one or more images.
- Control-click (right-click) and choose Quick Actions › Remove Background.
- A transparent PNG copy is saved next to each original.
If you don’t see it, open System Settings, search for Extensions, choose Finder and turn on Remove Background. Once EraseMyBG is installed, its own Erase Background action appears in the same menu (under Services) and opens the image ready to fine-tune.
How to remove the background in Photos on a Mac
The Photos app can lift a subject out of any photo in your library, but it copies the cutout rather than saving it.
- Open the photo in Photos.
- Control-click the person, pet or object and choose Copy Subject.
- Paste it into Messages, Notes, Keynote or Pages, or open Preview and choose File › New from Clipboard.
- Save the new image as a PNG. Saving as JPG fills the transparent area with white.
The same Copy Subject works in Quick Look (press Space on an image in Finder) and in Safari. It’s great for a sticker in a chat; for a file you’ll reuse, the steps add up fast. Your iPhone or iPad does the same with touch and hold; our complete background removal guide covers every device.
Remove the background in Keynote, Pages or PowerPoint for Mac
- Keynote and Pages: select the image, open the Image tab in the Format sidebar, and click Remove Background, or use Instant Alpha and drag across the color to remove. The change stays inside the document; drag the image to the desktop or export to reuse it.
- PowerPoint for Mac: select the picture, choose Picture Format › Remove Background, then use Mark Areas to Keep and Mark Areas to Remove to correct it. Control-click › Save as Picture exports a PNG.
Making slides often? Cut the image out in EraseMyBG, press ⌘ C, and paste it into the slide. The cutout keeps its full resolution and transparency.
Hair, fur and fine detail: where built-in tools struggle
Apple’s built-in tools use subject detection: they find the person or animal and draw an outline around it. That’s fast, but the outline is drawn at a lower level of detail than the photo itself. Flyaway hair, fur, a veil or the gaps between strands either get filled in or chopped off, and patches of background close to the subject can stay attached.
EraseMyBG’s High detail mode adds a dedicated AI matting model, trained to separate fine edges from what’s behind them, then cleans the old background color out of each edge pixel. The result holds up on a strong color, which is the real test of a cutout.
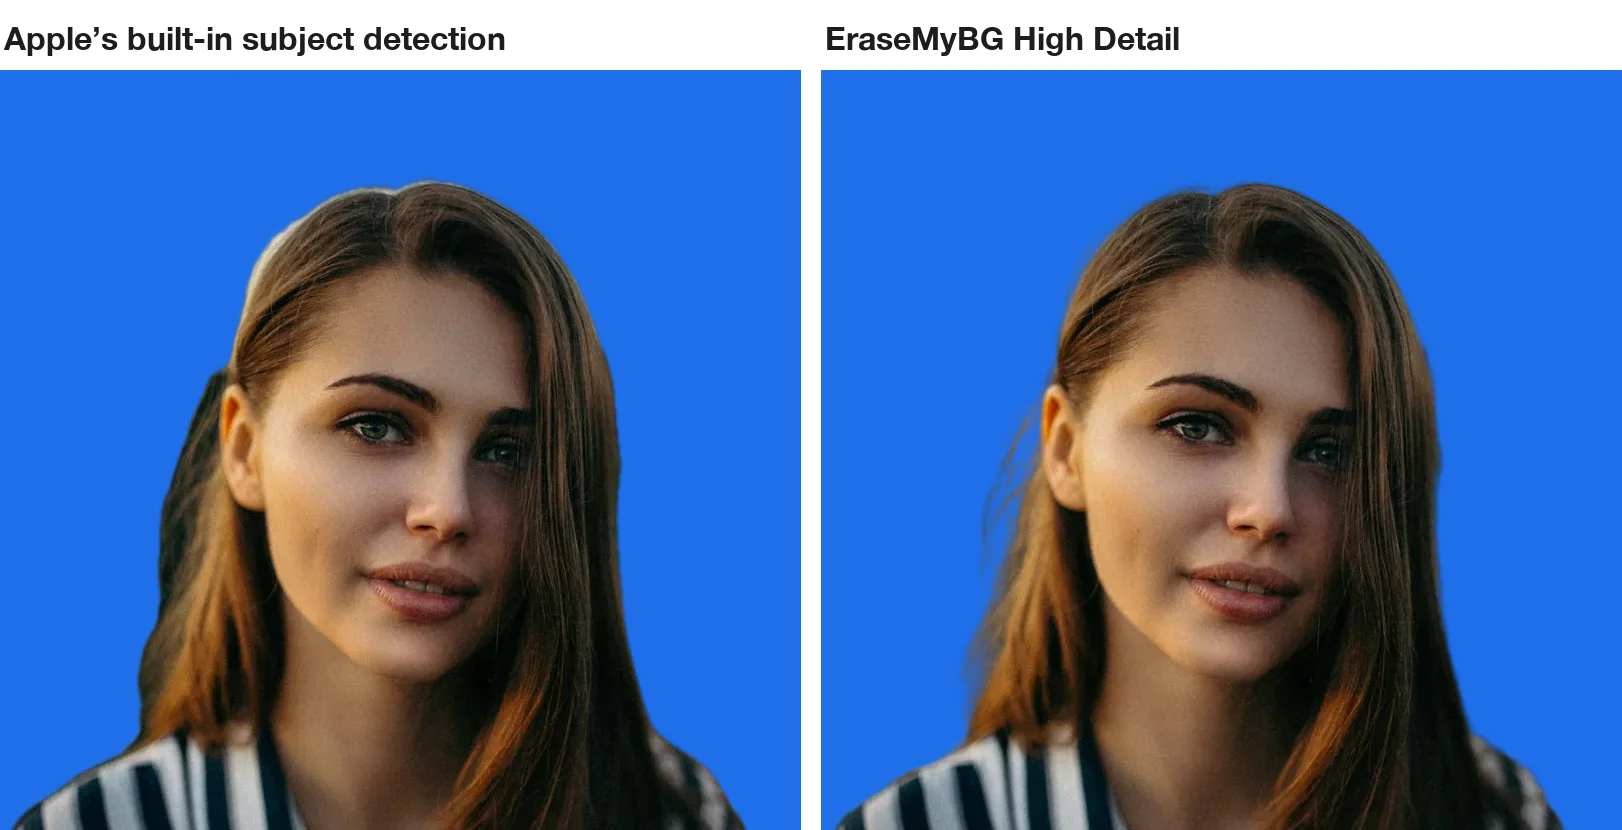
EraseMyBG includes both. Fast mode uses Apple’s subject detection for instant previews and simple shots, and High detail is there when the edges matter: headshots, pets, product shots for a store.
How to change the background color of a picture on Mac
Preview can remove a background, but it can’t add a new one: there’s no fill or color option behind the cutout. The usual workaround is to paste the cutout into Keynote on top of a colored shape and export the slide.
In EraseMyBG it’s one click under Background: pure White for marketplaces, any Color (with an eyedropper), a Gradient, a soft grey Studio backdrop, a Blur of the original photo for a portrait-mode look, or your own image. Add a contact or drop shadow so the subject sits naturally, then export at full resolution. Presets for Amazon, Shopify, Etsy, eBay, LinkedIn and more set the canvas size and framing for you.
Remove the background from many images at once
Finder’s Quick Action accepts a selection of files, but it uses the same settings for all of them and gives you no preview. EraseMyBG is built for volume:
- Batch: drop dozens of photos or a whole folder, choose the background, size and format once, and export them all.
- Watch folders: pick a folder, and every new image saved into it is processed automatically. Ideal for a product shoot tethered to your Mac.
- Shortcuts and command line: use the EraseMyBG actions in Shortcuts, or run
erasemybg -p amazon photos/*.jpgin Terminal.
Remove Background greyed out in Preview? Fixes
- There’s no clear subject. Preview only enables the command when it detects a person, animal or object in a photo. Screenshots, logos, text, documents and low-contrast photos stay greyed out. Use Instant Alpha for graphics.
- It’s a PDF. Export the page as a PNG first (File › Export, Format: PNG) and open that.
- The menu hasn’t caught up. Move the pointer over the image, wait a moment, or press ⇧ ⌘ K directly.
- It worked before and stopped. Quit and reopen Preview, or restart the Mac. In Finder, check the Remove Background extension is still turned on in System Settings.
- Still nothing. Open the image in EraseMyBG. It doesn’t depend on Preview’s menu, and Remove White handles the graphics Preview won’t.
If the cutout comes out with a black or white background instead of transparency, the file was saved as JPG or opened in an app that doesn’t show transparency. See why a transparent image shows a white background.
Why use an offline background remover on Mac
Your photos stay on your Mac
Web-based removers upload each image to a server. That matters for client work, children, ID photos, signatures and products that aren’t announced yet. EraseMyBG runs its AI models on your Mac’s own chip and works with Wi-Fi off.
Full resolution, no credits
Many online tools give a small preview for free and charge per image or per month for the full-size file. EraseMyBG exports at the original resolution every time, with no limit on how many images you process.
Built like a Mac app
Drag and drop, copy and paste, Finder and Shortcuts integration, a menu bar drop zone, and keyboard shortcuts for everything. It needs macOS 14 Sonoma or later and a Mac with Apple silicon (M1 or later).
Frequently asked questions
How do I remove the background from a picture on a Mac for free?
Open the image in Preview and choose Tools › Remove Background (Shift-Command-K), or right-click it in Finder and choose Quick Actions › Remove Background. Both are built into recent versions of macOS and save a transparent PNG. They work best on clear photos of one person, pet or product.
What is the best background remover for Mac?
For a quick one-off photo, the built-in Remove Background in Preview or Finder is enough. For hair and fur, logos and signatures, many images at once, or a new white, color or blurred background, a dedicated app such as EraseMyBG gives cleaner edges and more control. It runs offline on your Mac and costs $9.99 once, with no subscription.
Why is Remove Background greyed out in Preview?
Preview only enables Remove Background when it detects a clear subject in a photo. It stays greyed out for PDFs, screenshots, logos, text and images where the subject blends into the background. Try the shortcut Shift-Command-K, move the pointer over the image, convert the file to PNG, or restart Preview. For logos and graphics on white, use Instant Alpha or a remove-white tool instead.
How do I use Instant Alpha in Preview?
Open the image in Preview, click the Show Markup Toolbar button, and choose Instant Alpha from the selection tools (the magic-wand icon). Click and drag across the background: dragging further selects more similar colors. Press Delete to remove the selection, repeat for enclosed areas, then save as PNG.
How do I remove the background in Photos on a Mac?
Photos on Mac can't save a cutout directly, but it can copy one. Open the photo, Control-click the subject and choose Copy Subject. Then open Preview and choose File › New from Clipboard, and save the result as a PNG to keep it transparent.
How do I change the background color of a picture on a Mac?
Preview can remove a background but can't fill it with a new color. Paste the cutout into Keynote or Pages on top of a colored shape, or use EraseMyBG: choose Color, White, Gradient, Studio or Blur under Background and export, all in one step at full resolution.
Does Remove Background on Mac work on hair?
It finds the person reliably, but fine strands of hair, fur and the gaps between them often come out solid or clipped, and patches of background can stay attached to the hair. EraseMyBG's High Detail mode uses a separate AI matting model made for these edges and then cleans the background color out of the edge pixels.
Can I remove the background from multiple images at once on a Mac?
Finder's Quick Action works on selected files but gives you no control over the result. EraseMyBG has batch processing: drop a folder or many files, choose a background and size, and it exports them all. Watch folders process new images automatically as they arrive.
Is it safe to use online background removers?
Online removers upload your image to their servers to process it. That's a concern for client photos, ID documents, signatures and unreleased products. Preview, Finder and EraseMyBG all process images on your Mac, so nothing is uploaded.
How do I remove the background on a Mac in PowerPoint or Keynote?
In Keynote or Pages, select the image and open the Image tab in the Format sidebar, then use Remove Background or Instant Alpha. In PowerPoint for Mac, select the picture and choose Picture Format › Remove Background, then mark areas to keep or remove. To reuse the cutout elsewhere, export it as a PNG.
EraseMyBG for Mac
Remove backgrounds on your Mac in one click.
Hair-level cutouts, Remove White for logos, new backgrounds, marketplace presets and batch folders. Offline and private. $9.99 once for 3 Macs, no subscription.
Related guides
How to remove the background from a picture ›
The complete guide: people, pets, products and groups, on every device, plus what to put behind your cutout.
How to make an image transparent ›
Every way to remove a background and save a transparent PNG, on Mac, Windows, iPhone, Office and Photoshop.
How to remove a white background ›
Logos, signatures, scans and product photos: clean transparent PNGs with no white fringe.
Install and activate EraseMyBG ›
Download, the one-time “Open Anyway” step, and activating your key.
Not sure it will handle your photos? Send us one and we’ll show you the result. Or get EraseMyBG and try it with a 14-day refund.