How to make an image transparent
Whether you need a transparent PNG of a product, a logo without its white box, or a portrait you can drop onto any slide, it comes down to the same two steps: remove the background, then save in a format that keeps transparency. Here’s how to do both on every device you’re likely to use.
By the EraseMyBG team · Updated October 5, 2026 · 9 min read
Quick answer
To make an image transparent, remove its background with a background remover, then save it as a PNG. JPG can’t store transparency. On a Mac, right-click the image in Finder and choose Quick Actions › Remove Background; on Windows 11, open it in Paint and click Remove background; on iPhone, touch and hold the subject in Photos. For hair, logos and batches at full resolution, use a dedicated app such as EraseMyBG.
- Transparent pixels have an alpha value of 0; the checkerboard you see means “nothing here”.
- Use PNG (or WebP, HEIC, TIFF) for transparency. Never JPG.
- For solid white backgrounds (logos, signatures), use a color-key tool, not subject detection.
- Want the whole picture see-through instead? That’s opacity, a different setting.


Drag to compare. Cutout made with EraseMyBG on a Mac, flyaway hair included.
What does it mean to make an image transparent?
An image is transparent where you can see through it to whatever is behind. Formats like PNG store this in an alpha channel: a fourth value for every pixel, alongside red, green and blue, that says how opaque the pixel is. When people search for how to make a picture transparent, they almost always mean making the background transparent: the subject stays solid and everything around it disappears, so it sits cleanly on any color, slide, website or video.
A = 255
Opaque
A = 170
67% visible
A = 85
33% visible
A = 0
Fully transparent
Good cutouts aren’t just “on or off”. Hair, fur, glass and soft shadows need partial alpha at the edges, which is why a quick magic-wand selection often leaves a jagged outline or a faint halo of the old background. Better tools estimate a soft edge and clean the old background’s color out of it.
Which method should you use?
| Method | Best for | Cost | Watch out for |
|---|---|---|---|
| macOS Finder / Preview | Quick one-off on a Mac | Free, built in | No edge refinement, one image at a time, no brushes |
| Preview Instant Alpha | Solid-color backgrounds | Free, built in | Manual, struggles with gradients and hair |
| EraseMyBG | Hair and fur, logos, batches, marketplace photos | $9.99 one-time | Mac only (Apple silicon) |
| Windows 11 Paint | Quick one-off on Windows | Free, built in | Basic edges |
| PowerPoint / Word | Images already in a document | With Microsoft 365 | Set Transparent Color removes only one exact color |
| iPhone Photos | Lifting a subject on the go | Free, built in | Hard to control edges or export size |
| Photoshop / GIMP | Full manual control | Subscription / free | Learning curve, slow for many images |
| Online removers | Any device with a browser | Free tiers, then credits | Uploads your photo; free downloads are often reduced in size |
How to make an image transparent on a Mac
macOS has two built-in ways to remove a background, and one manual tool for solid colors. If they’re not enough, use a dedicated app.
Option 1: Finder Quick Action (macOS Sonoma or later)
- Right-click (or Control-click) the image in Finder.
- Choose Quick Actions › Remove Background.
- A transparent PNG named “… Background Removed” appears next to the original.
Option 2: Preview’s Remove Background (macOS Ventura or later)
- Open the image in Preview.
- Choose Tools › Remove Background, or press ⇧ ⌘ K.
- If the file is a JPG, Preview asks to convert it to PNG. Accept, then choose File › Save.
Option 3: Preview’s Instant Alpha, for solid colors
- In Preview, click the Markup button (the pen icon) to show the Markup toolbar.
- Choose Instant Alpha (the magic-wand icon), then click and drag across the background color. Dragging further selects more similar colors.
- Press Delete, then save as PNG.
Option 4: EraseMyBG, for hair, logos and batches
The built-in tools work on clear photos, but they give you no way to refine an edge, change the backdrop or process a folder. EraseMyBG runs a high-detail AI matting model on your Mac, then cleans the old background’s color out of soft edges so hair and fur don’t glow with a halo.
- Open the image. Drag a JPEG, PNG, HEIC, TIFF or WebP onto the window, paste with ⌘ V, or right-click it in Finder and choose Erase Background.
- Let it find the subject. People, pets and products are detected automatically; several subjects can be kept or dropped with a click.
- Keep Background on None. Fix any edge with the Erase and Restore brushes.
- Export as PNG. Click Export. The transparent PNG keeps the photo’s full resolution and color profile. Or press ⌘ C and paste it straight into Keynote, Figma or Slack.
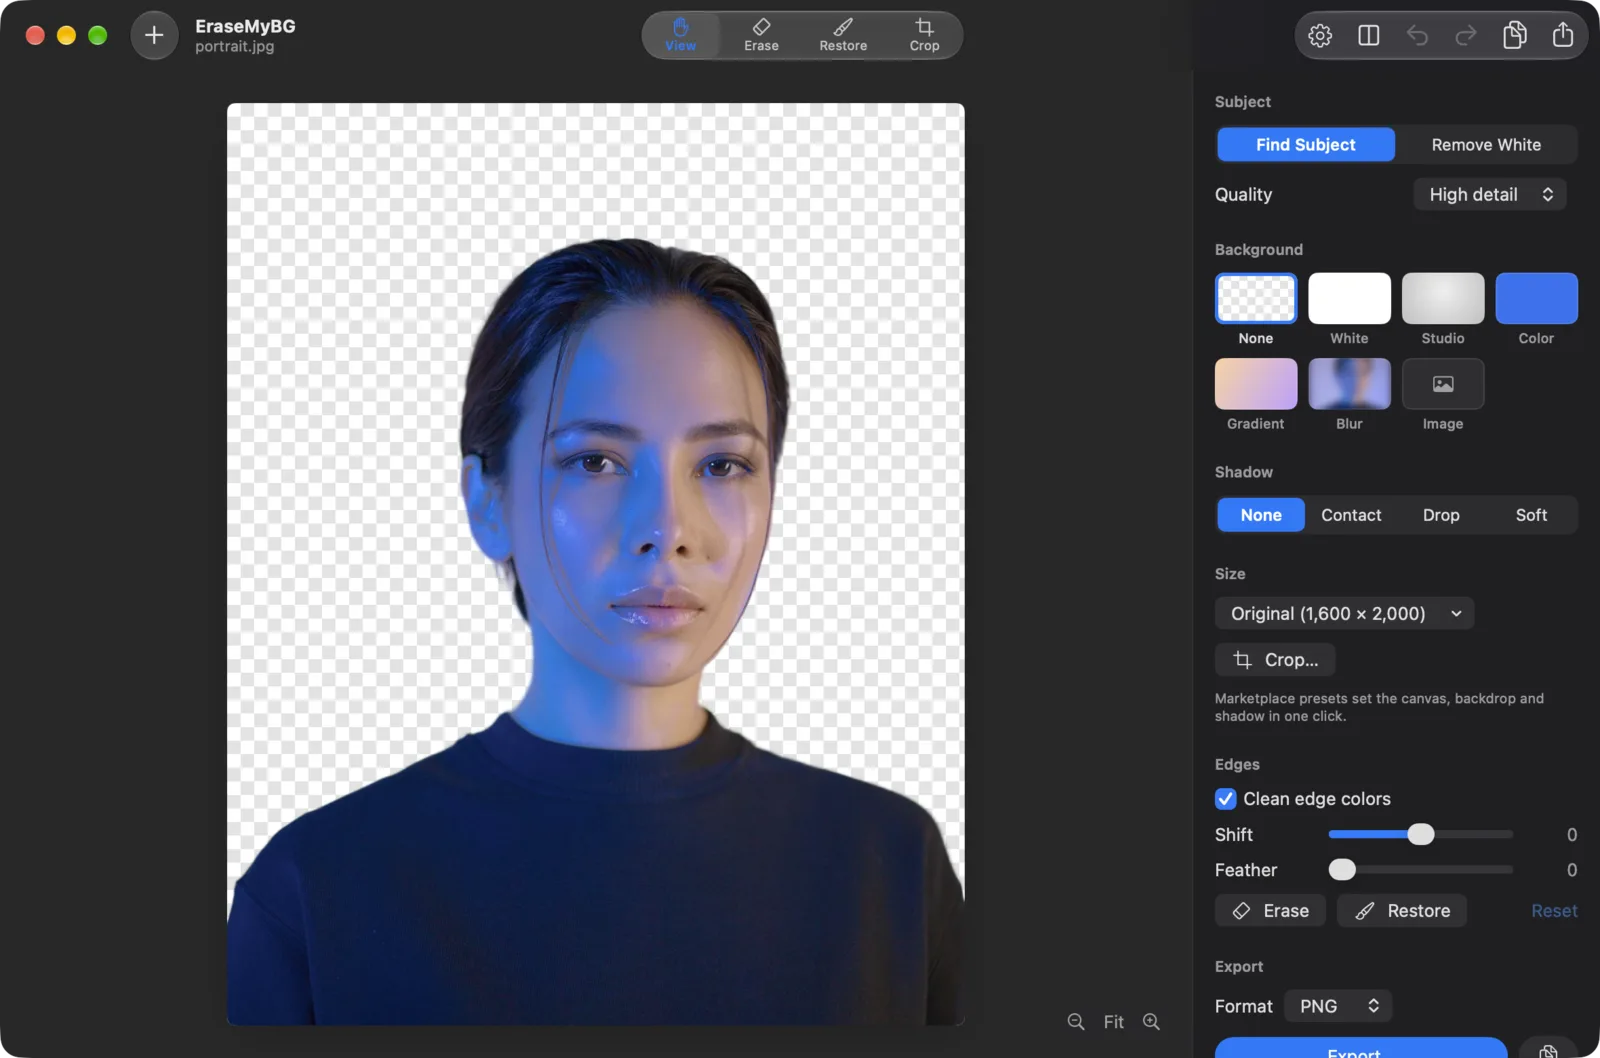
Got a whole shoot? Drop a folder on the window, or use Batch a Folder to export every image as a transparent PNG in one go. Get EraseMyBG for $9.99, a one-time purchase that works on 3 Macs.
How to make a logo or signature transparent
Logos, signatures, stamps and scanned drawings don’t have a “subject” for an AI model to find, and their thin lines get eaten by tools built for photos. What you want instead is a color key: remove one background color (usually white paper) and keep everything else, including anti-aliased edges.
- On a Mac: in EraseMyBG, switch Subject to Remove White. It detects the paper color, separates the ink from it, and keeps thin strokes and lettering. Tick Make strokes solid for logos with flat colors.
- Built-in alternative: Preview’s Instant Alpha, or PowerPoint’s Set Transparent Color (one exact color only, so it leaves a fringe on JPEG logos).
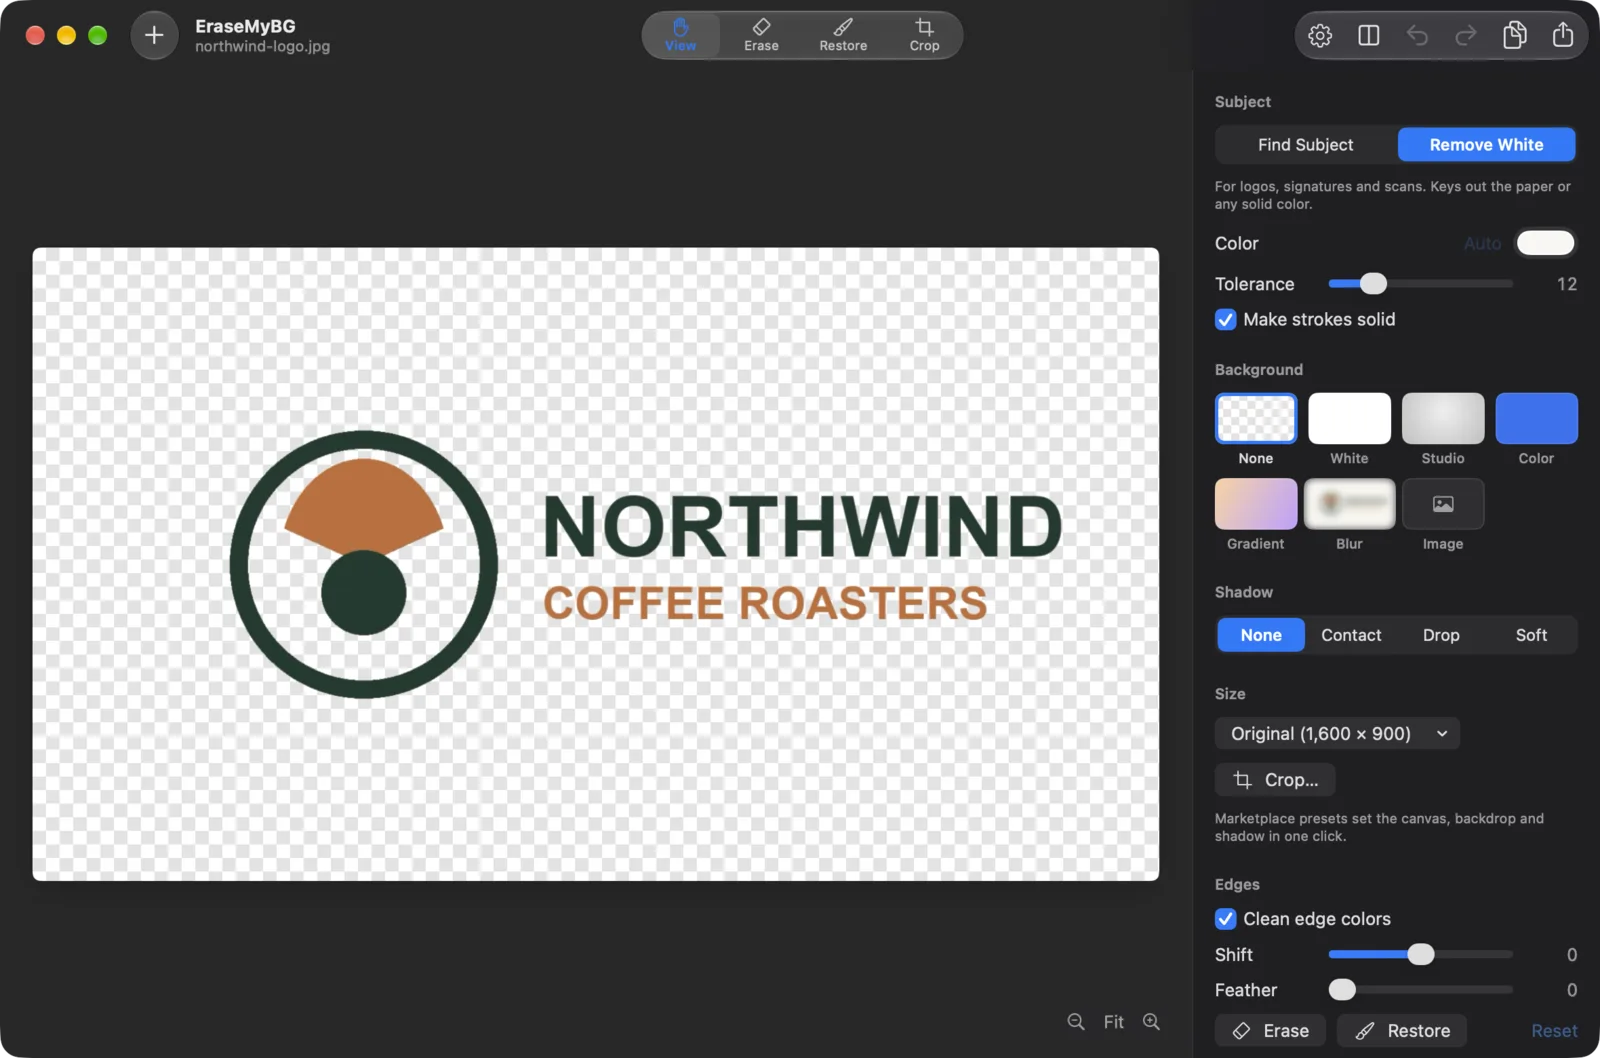

Before: JPG with white box

After: PNG on dark green
After: PNG on a gradient
How to make an image transparent on Windows
Windows 11’s Paint app can remove a background on its own (it arrived in Paint version 11.2306 in late 2023).
- Open the image in Paint.
- In the Image group on the toolbar, click Remove background. To limit it to part of the picture, make a selection first.
- Choose File › Save as › PNG picture. Saving as JPEG fills the background with white again.
How to make a picture transparent in PowerPoint and Word
Microsoft 365 gives you three different tools, and they do different things:
- Remove Background (Picture Format › Remove Background): detects the subject; mark areas to keep or remove, then click Keep Changes.
- Set Transparent Color (Picture Format › Color › Set Transparent Color): click one color and every pixel of exactly that color disappears. Best for flat graphics; you can only pick one color per image.
- Transparency (Picture Format › Transparency): makes the whole picture see-through, from 0% to 100%. Use it for watermarks and faded backgrounds behind text.
How to make an image transparent in Google Slides
Google Slides can make a whole image fade, but it can’t remove a background. Select the image, choose Format options › Adjustments, and drag Transparency. For a cutout with no background, make a transparent PNG first with one of the tools above, then Insert › Image; Slides keeps PNG transparency.
How to make an image transparent on iPhone and iPad
- Open the photo in Photos (iOS or iPadOS 16 or later).
- Touch and hold the subject until a glowing outline appears, then let go.
- Choose Copy to paste the cutout into another app, or Share to send or save it. On iOS 17 and later you can also choose Add Sticker.
It’s quick, but you can’t fine-tune the edge, and some apps you paste into flatten the result onto white.
How to make an image transparent in Photoshop, GIMP and Canva
Photoshop
- Unlock the Background layer (click its lock icon).
- In the Properties panel, under Quick Actions, click Remove Background. Photoshop adds a layer mask you can paint on to refine.
- Choose File › Export › Export As and pick PNG with Transparency on.
GIMP (free)
- Choose Layer › Transparency › Add Alpha Channel.
- For a solid background, use Colors › Color to Alpha; for photos, select the background with the Fuzzy Select or Foreground Select tool and press Delete.
- Choose File › Export As and save as .png.
Canva
Select the image, choose Edit › Background Remover, then Share › Download › PNG with Transparent background ticked. Both the background remover and the transparent download need Canva Pro.
How to make an image transparent online
A free online transparent background maker works on any device: upload, wait, download a PNG. Before using one, check three things: whether the free download is reduced in size (many limit the free tier to a preview resolution), whether you’re comfortable uploading the photo to someone else’s server, and how many credits a batch would cost. For client work, unreleased products or personal photos, an offline tool avoids the upload entirely.
Save it in a format that keeps transparency
The background removal is only half the job. Save in the wrong format and the transparent pixels are filled with white or black.
| Format | Transparency? | Use it for |
|---|---|---|
| PNG | Yes, full soft alpha | The default choice: logos, cutouts, slides, design tools. Lossless. |
| WebP | Yes | Websites; much smaller files than PNG. |
| HEIC / HEIF | Yes | Apple devices; small files. |
| TIFF | Yes | Print and pro workflows. |
| GIF | Only on/off, no soft edges | Simple graphics; hair and shadows look jagged. |
| SVG | Yes (vector) | Logos drawn as shapes, not photos. |
| JPG / JPEG | No | Photos with a background. Transparent areas turn white. |
Converting a JPG to PNG doesn’t remove anything by itself. “JPG to transparent PNG” always means: remove the background first, then save as PNG.
Why does my transparent image have a white background?
- It was saved as a JPG. Re-export as PNG from the original cutout.
- The viewer draws white behind it. Some apps show transparency as white or black. Drop the PNG onto a colored slide to check.
- An app flattened it. Many chat apps, email clients and some social networks convert uploads to JPG. Send the PNG as a file or document instead.
- The background was only made invisible in one app. Office’s and Google Slides’ effects live inside that document. Save the picture out as a PNG to keep it.
- There’s a faint halo. The edge still contains the old background’s color. Use a tool that cleans edge colors, or shrink the mask edge by a pixel.
How to make a whole image semi-transparent
Sometimes “transparent” means the entire picture should be see-through, for a watermark or a faded backdrop behind text. That’s opacity, not background removal: in Keynote use Format › Style › Opacity, in PowerPoint and Word Picture Format › Transparency, in Google Slides Format options › Adjustments › Transparency, and on the web the CSS property opacity. To bake the effect into a file, export from those apps as PNG.
Frequently asked questions
Can you make a JPG transparent?
Not as a JPG. The JPEG format has no alpha channel, so it can't store transparency. Remove the background, then save the result as a PNG (or WebP, HEIC or TIFF). Converting a JPG to PNG on its own doesn't make anything transparent; the background has to be removed first.
How do I make the background of a picture transparent for free?
On a Mac running macOS Sonoma or later, right-click the image in Finder and choose Quick Actions › Remove Background, or open it in Preview and choose Tools › Remove Background. On Windows 11, open it in Paint and click Remove background. On iPhone (iOS 16 or later), touch and hold the subject in Photos and choose Copy or Share. All of these are built in and free.
How do I make a logo transparent?
Logos usually sit on a plain white or solid-color background, so use a color-key tool rather than subject detection: Preview's Instant Alpha, PowerPoint's Set Transparent Color, or EraseMyBG's Remove White mode, which removes the paper color while keeping thin lines and text intact. Save the result as a PNG.
Why does my transparent PNG show a white or black background?
Usually one of three things: the file was saved or converted to JPG, the app you're viewing it in draws a white or black canvas behind transparent areas, or the image was sent through an app that flattens transparency (many chat apps and email clients do). Open the PNG in Preview or a browser on a checkerboard to confirm the transparency is really there.
How can I tell if an image is transparent?
Open it in an image editor or Preview and look for the gray-and-white checkerboard behind the subject, or drop it onto a colored background in Keynote, PowerPoint or Canva. On a Mac, Get Info (Command-I) on a PNG shows an alpha channel under More Info when one exists.
Does making an image transparent reduce its quality?
No. Removing the background and saving as PNG is lossless. Quality only drops if a tool downsizes the image (some free online removers limit the download resolution) or if you save in a lossy format at low quality. EraseMyBG exports at the original resolution.
What's the difference between a transparent background and making an image transparent?
A transparent background means the subject stays solid and everything around it becomes invisible (alpha 0). Making the whole image transparent means lowering its opacity so the entire picture becomes see-through, like a watermark. Background removers do the first; the Transparency or Opacity slider in PowerPoint, Word, Keynote and Google Slides does the second.
How do I make an image transparent in Google Slides?
Google Slides can lower an image's opacity (select the image, open Format options › Adjustments, drag Transparency), but it can't remove a background. To get a cutout in Slides, make the background transparent first with another tool, save it as a PNG, then insert that PNG.
Can I make an image transparent without uploading it?
Yes. The macOS, Windows and iPhone tools above work on your device, and EraseMyBG runs its AI entirely on your Mac, so private photos, client work and unreleased products never leave it. Most free websites need you to upload the image to their server first.
EraseMyBG for Mac
Transparent PNGs in seconds, at full resolution, without uploading anything.
Hair-level cutouts, Remove White for logos, batch folders, Finder and Shortcuts. One-time purchase, 3 Macs.